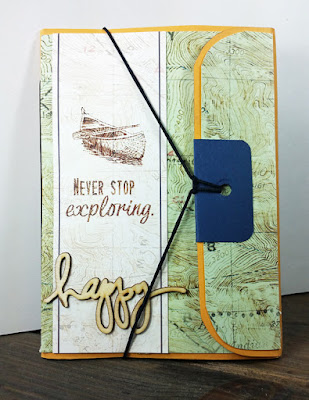
Adirondacks Envelope Book
The Club Scrap YouTube channel is an amazing source of inspiration. There are so many great video tutorials available, it's nice to have a reminder from time to time!
Supplies:
6 x 9" Manila Envelope
12" Elastic Cord Closure
18" Waxed Linen Thread and Needle
(3) 6.25 x 9" Inside Pages, Folded
(2) 4.5 x 6.25" Front and Back Cover Papers
6.25 x 3.5" Pocket Flap Cover, Folded Vertically
4-7/8 x 6.25" Pocket Insert
(12) 4 x 5.75" Photo Mats (optional)
Corner Chomper
Crop-A-Dile
Piercing Cradle
Awl
Bone Folder
Follow the steps outlined in Tricia's video to assemble the envelope booklet, with the following adjustments:

Once the book is assembled, decorate inside pages with elements from the Adirondacks Deluxe kit: EP Cutaparts, mats and kraft envelopes tied with checked ribbon.


Kraft envelopes tied with ribbon are great for hidden messages or storing memorabilia.


My envelope book was inspired by a video tutorial by Tricia Morris. Her Shades of Winter version made from coin envelopes was adorable, but I wanted something a bit larger. Therefore, I adjusted the project measurements to work with a 6 x 9" manila envelope.
Tricia wrote a blog post including a list of supplies and details for a coin-sized envelope. My materials list below has been adjusted for a larger 6 x 9" envelope size.
Supplies:
6 x 9" Manila Envelope
12" Elastic Cord Closure
18" Waxed Linen Thread and Needle
(3) 6.25 x 9" Inside Pages, Folded
(2) 4.5 x 6.25" Front and Back Cover Papers
6.25 x 3.5" Pocket Flap Cover, Folded Vertically
4-7/8 x 6.25" Pocket Insert
(12) 4 x 5.75" Photo Mats (optional)
Corner Chomper
Crop-A-Dile
Piercing Cradle
Awl
Bone Folder
Follow the steps outlined in Tricia's video to assemble the envelope booklet, with the following adjustments:
- Before assembly, gently remove prong from manila envelope, if applicable.
- Use 1/4" hole punch setting on the Crop-A-Dile to re-punch prong hole after adding pocket flap cover.
- Skip trimming closed end of envelope to create a second pocket.
- Reinforce envelope flap with layers of card stock, threaded with black elastic cord to create the closure. (In lieu of the ribbon used in Tricia's project.)

Once the book is assembled, decorate inside pages with elements from the Adirondacks Deluxe kit: EP Cutaparts, mats and kraft envelopes tied with checked ribbon.


Kraft envelopes tied with ribbon are great for hidden messages or storing memorabilia.

Add photos and enjoy!

The next time your creative mojo needs a kick in the pants, visit Club Scrap's YouTube channel for ideas. Happy crafting!

Gorgeous work, Karen! This is a great size for a mini!
ReplyDeleteThank you, Pam. I had a lot of fun trying this size.
DeleteI love how you made this project your own with the little extra details. Mathematical conversions are not my forte, I'm so glad you tackled this for us! Such a fun challenge this month, Club Scrap project tutorials are the BOMB!
ReplyDeleteThank you for the kind comments. My mantra is, "Math is hard!", LOL, but I managed okay with this one. You're so right about Club Scrap tutorials...they ARE the best!
ReplyDelete